I’m a pro when it comes to putting on false lashes – even though I only do it once in a blue moon (aka for a photo shoot or special event). But there are days I want to add a little something extra to my eyelid-flutter, without going all-out. Enter the individual lash.
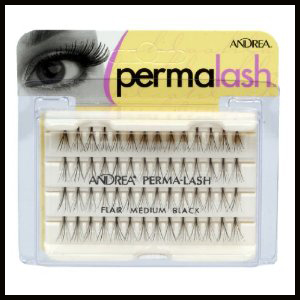
When it comes to individual lashes, unlike the full sets (I stick to She Uemura or Make Up For Ever for lashes that look natural and stay put), drugstore-quality does just fine! Actually, it really couldn’t be better – or cheaper. Even if you’re going sans eyeliner, a few Andrea Perma-Lashes and you’re good to go, looking wide-eyed and polished.
Here’s what I do:
1) Apply a single coat of mascara, so the false lashes have something to cling to.
2) Take a pair of tweezers (regular, not travel size) and carefully pick up the single lash cluster from the container by the tip (not the end you’ll be applying to your lid).
3) Gently stick it in the clear – or it also comes in black, if you prefer – adhesive (Andrea’s comes with a little sponge to pour the glue onto for easy access).
4) With the tweezers, lightly press the lashes towards the outer corners of your lid, right on the lash-line.
5) Three to four “individual” lashes on each eye – the closer to the outside edge you go, the more of a cat-eye you get – and you’re lashes have improved dramatically.
6) Top your fringe with a second coat of mascara to really make it all stick, and you are good to go.
Individual lashes, $11.96 (for a pack of four), and adhesive, $3.75, on Amazon.

